
How to automatically analyze behavior video?
DeepLabCut is a powerful tool to rapidly1 train a neural network (based on ResNet) to track keypoints on movement videos, esp. those of moving human or animals. Thus this is a game changing tool for all kind of behavior quantification for neuroscience and psychology researchers (can be applied to nearly any behavioral science topic, e.g. motor learning, motor control, facial expression, social interaction…). The workflow is relatively simple and it scarcely takes time after the network have been trained, and the video analysis can be done automatically. Because of this it’s really favorable to the reserchers doing long term ecological video recording.
However, several persisitant GUI bug in this module drives me to find a workaround of that, which result in the pipeline in this technical post.
Problem: Highly unstable GUI of DeepLabCut
I’ve installed DeepLabCut 2.0 on Windows 10 (with GPU) and Ubuntu environment. In both setting I faced quite serious GUI crash problem, which means there are thousands of ways that you can click the wrong button / in the wrong order / drag the slide bar too fast / in the retrograde direction, which can cause the GUI breakdown, and in many cases the python kernel crash togetherwith. However, if there is no GUI involved, the DeepLabCut works really well! Building up and training deepnetwork (using GPU), analyzing, annotating and exporting video work smoothly and coherently. 2 This bug is driving me mad, as it could crash and destroy the unsaved dataset (the most labor costing part of this pipeline) you are making when doing annotation. This is unacceptable for a smooth workflow.
Certainly, the GUI is inevitable in the frame selection and keypoint annotation processes. But I notice that the DeepLabCut module only requires input from the bunch of frames/images and data table files, CollectedData_xxx.csv and CollectedData_xxx.h5. Thus I get the idea that I can use some more robust and common software with GUI to annotate and save the keypoints’ coordinates, and covert that into the formats (.csv,.h5) that DeepLabCut requires to construct its training dataset. This is the motivation of this project.
Tools
As I usually do, I try to combine several pre-established tools with respective advantages and build the interface between them to make them function concertedly.
Tools
DeepLabCut: the recent game changing breakthrough, which is the major player of this pipeline.ImageJ: traditional image analysis software for scientific image analysis. It has pretty robust and easy to use GUI and lots of plugins. It can transform the.avimovie into frame sequences in many formats, and can also take screenshots and save as image files. Thus, it’s suitable for Frame ExtractionPoint Picker: An ImageJ plugin developped by EPFL scientists which can pick up to 1024 points [^2] in an image, and can deal with image sequence well. Thus it’s suitable to Label Frames
- Interface (data format transforming) script: (The only part I write) Transform the output file of
Point Pickerto the required formats ofdeeplabcut.create_training_dataset(.).Pandas:DataFrameinPandasis the intermediate data structure I used to do the transformation.
Workflow combining ImageJ and DeepLabCut
Here is the complete workflow / protocol we can follow when starting a behavioral quantification project.
- Video recording
- Create a project in
DeepLabCut:config_path =deeplabcut.create_new_project('Name of the project','Name of the experimenter', ['Full path of video 1','Full path of video2'], working_directory='Full path of the working directory',copy_videos=True/False)
- Frame Extraction:
- We can use the automatic extraction tool in
deeplabcutas baseline:deeplabcut.extract_frames(config_path,'automatic','kmeans', crop=True, checkcropping=True)(which is relatively robust) - And then, supplement it with manual selection from
ImageJ - Open the video with
ImageJ. Slide and select the key frames and saveaspngfiles inImageJ - Note the training set can consist of frames of different size, cropped and uncropped mixed together.
- We can use the automatic extraction tool in
- Label the Frames:
- We can use the GUI tool in
deeplabcut.label_frames(config_path) - Or
- Use the ImageJ,
Point PickerpluginImport>Image Sequenceselect the folder of the extracted frames- Open
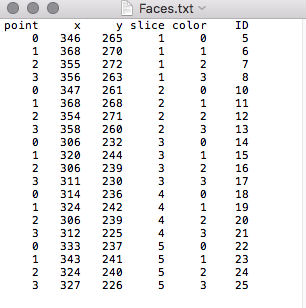
Point Pickerand mark the key points in sequence from the first image. - Export the coordinates data with
Import/Exporttool. save thedata.txtfile
- Convert the
txtdate intocsvandhdf5
- We can use the GUI tool in
- Check the annotation:
deeplabcut.check_labels(config_path)
- Create Dataset:
deeplabcut.create_training_dataset(config_path,num_shuffles=1)
- Train Network:
deeplabcut.train_network(config_path,shuffle=1)
- Evaluate Network: See the training loss and test loss
deeplabcut.evaluate_network(config_path,shuffle=[1], plotting=True)
- Video Analysis:
deeplabcut.analyze_videos(config_path,['/analysis/project/videos/reachingvideo1.avi'], shuffle=1, save_as_csv=True)
deeplabcut.create_labeled_video(config_path ['/analysis/project/videos/reachingvideo1.avi','/analysis/project/videos/reachingvideo2.avi'])
deeplabcut.plot_trajectories(config_path,['/analysis/project/videos/reachingvideo1.avi'])
And Voila! Here is the tracking result: Tracking result
Drawback
Smooth as it may seem, there is an drawback of this annotation workflow. The annotation function is not exactly equivalent to the native DeepLabCut one. Note, in original DeepLabCut module, it’s allowed to miss some label in a frame, as occlusion happens sometime. But it’s harder to do so in ImageJ setting.
This is a major direction that I’d like to improve if I’d heavily lean on this pipeline.
Appendix: Solution Process and Reference
(This part is a collection of references that I checked in this process. )
Major dataframe I/O lines in DeepLabCut module
self.oldDF = pd.read_hdf(os.path.join(self.dir,'CollectedData_'+self.scorer+'.h5'),'df_with_missing')

self.dataFrame.to_csv(os.path.join(self.dir,"CollectedData_" + self.scorer + ".csv"))
self.dataFrame.to_hdf(os.path.join(self.dir,"CollectedData_" + self.scorer + '.h5'),'df_with_missing',format='table', mode='w')
Reference for Pandas data table construction
Details at my github repertoire KeyPointDataPreprocess4DeepLabCut.
-
It is REALLY FAST! The first time I trained a network to track facial keypoints, it was all within half an afternoon. ↩
-
I’ve looked for solutions for this problem. The cause of the bug may root in the complex interaction of GUI, C++ system and the python modules. I cannot find a solution to that online, maybe this is a unique problem of my computer setting. Or maybe it’s just an unsolved bug of the module, as it’s fairly new. ↩